Showing posts with label vegetarian. Show all posts

October 25, 2012

Baingan Bartha, Bounty, & Food Stamps

Forgive me readers, for I have sinned.  I went an entire month without dumpstering.  How is this possible?!  I'm pretty upset about it.  Still, I think I have some decently good excuses why I haven't been as active in the trash lately:

I moved a few months ago and haven't found good dumpsters close to my new house. I was going to the dumpsters near my work...until I left that job in August (explaining why I didn't dumpster at all in August). 2: Leaving my job allowed for me to get food stamps again (I need the money for non-dumpster-able items like olive oil, etc, I just also started using it for everything else too)...now, I know this makes me a lazy dumpster diver and probably shows you that a big motivation for my dumpstering is saving money as opposed to saving the planet. Still, that motivation is there.
Bottom line is this: I have decent excuses for not dumpstering a whole lot lately. I have some friends who are showing me some new spots, soon, though...so hopefully I'll resume my normal dumpstering routine in no time. Since I got food stamps, I've been taking the leftover amount of funds I have in the account and have been buying dry or canned goods and have been donating them to a food shelter so they don't go to waste (shh, don't tell)! I think a good idea might be to start dumpstering again so that the amount of food I can donate increases (I've also been cooking for starving artist friends a lot lately, so that sort of counts as donating food to a worthy cause too).

July Bounty (really out of date, I know, but:)

7/24/12 – Food Lion

-       Bag of broccoli
-       2 pkgs cherry tomatoes
-       1 red bell pepper
-       1 loaf honey wheat bread
-       2 pkgs kiwis

7/26/12

Tried a new Trader Joe’s during the day – nothing good this time.

7/29/12

Chamomile tea, morrocan mint tea left in a "free" box by co-workers.

 BAINGAN BARTHA


I had gotten really tired of making my usual eggplant dishes: eggplant parmesan, ratatouille, baba ganoush...and then I dumpstered another eggplant.  So, I tried going WAY outside my comfort zone to try an Indian dish out.  I'm really unfamiliar with Indian cooking, so the picture looks pretty gross below.  However, it still tasted pretty good, even if it was a little off from the baingan bartha I'm used to having at restaurants.  Hopefully this is my first and worst foray into the land of Indian cuisine, and that practice will be on my side with this one.

Ingredients:
-  A few cups of brown cooked rice to put the mixture over (pasta will suffice, but will be weirder)
- 1 small onion, chopped
- 1 tomato, chopped
- 1-4 jalapenos (depending on how you like your spiciness), chopped & seeded
- 3-4 chopped garlic cloves, minced
- 1-2 inches chopped ginger
- Olive oil
- Yellow curry powder - optional
- Coriander to taste

Step one: roast your eggplant.  Here's a nice video with instructions here.
Step two: take the pulp and put it in a saucepan with about a tbsp of olive oil.  Add the onions until they're soft, then the jalapenos, garlic, and ginger, then tomato.  Keep at a medium or medium-low heat until you start to smell the aromas mixing together.
Step three:  Add salt, coriander, and curry to taste.
Step four:  Taste and adjust flavors until it tastes right, then serve!

Ingredients not dumpstered or donated: Spices, olive oil

August 21, 2012

Spicy Slow-Roasted Tomato Hummus & Pita Chips

It's been a while since I posted an actual recipe, so here goes:
Sometime in 2010, I made an incredibly delicious spicy tomato hummus that looked like vomit but tasted like heaven (coining the term heavom).  Since then, I've been on a quest to recreate the recipe since I didn't write the original down.  Finally, two years later, I think I've approximated it (more or less).  I give you: Spicy Slow-Roasted Tomato Hummus with Homemade Pita Chips!


STEP 1: SLOW-ROASTED TOMATOES

Slow-roasted tomatoes are really very easy - it's kind of the same process as making raisins out of grapes - you're just slowly drying the tomatoes out.  They range from hot and flavorful to sun-dried, depending on how long you leave them in the oven for.  Basically, you just put those suckers on a baking pan, coat them in olive oil, salt, and pepper (you can add other spices or garlic if you want to get fancy).  Then, you leave the tomatoes in the oven for a very long time (2-3 hours) at a very low temperature (around 200-250 degrees Fahrenheit).  Just check on them after the two hour mark and take them out when they're at the desired chewiness.  I'll usually use 1 package of dumpstered cherry tomatoes for this, but any type will suffice.  You can also use slow-roasted tomatoes in breakfast dishes (divine with a poached egg), bruscettas, tomato sauce, etc.  Add some garlic in the pan to roast for fun. 

STEP 2: SLOW-ROASTED TOMATO HUMMUS

 Using the slow-roasted tomatoes, the next step can either be very hard or very easy, depending on whether or not you have a food processor.  If you do, you're in luck - you get the easy road.  Otherwise, get ready - you're in for a lot of cutting, mashing, and pain.

Ingredients:
- 1 can chickpeas
- Your slow-roasted tomatoes
- Juice from 1/2 an orange (or OJ from the carton in a pinch) - this is crucial as it brightens the flavor of the hummus considerably
- Juice from 1/2 a lemon or lime
- 2 tbsp tahini (the first time I did this, I made my own tahini, which involves roasting sesame seeds and painstakingly hand-crushing them while adding olive oil.  I don't recommend making your own tahini unless you're a sadist)
- 2-5 tbsp olive oil
-1-2 cloves roasted garlic (optional)
- 1-3 cloves fresh, peeled garlic
- 1-3 tsp cayenne pepper (to taste)
- 1 tsp cumin (to taste)
- salt & pepper to taste
- If you're not using tomatoes, sometimes a tsp or two of water will be needed.

Throw it all in the food processor.  Otherwise, have fun mashing and mixing the ingredients.  If you choose this route, there's a high likelihood that you will be crying by the end of the process.

Makes roughly 6-8oz. 


STEP 3: HOMEMADE PITA CHIPS

Homemade pita chips are perfect for when your pita bread is starting to go slightly stale, or if you got way too much from the dumpster.  You can use pita chips like any regular salty snack by themselves, or you can use them for dipping in hummus, salsa, or cream cheese based dips.  It's really simple (I wonder why people buy pita chips at all): cut your pita into 8ths, then use a brush to brush olive oil on each side of each chip, laying your chips on a tin foil-covered baking sheet when you're finished.  Add salt, pepper, and whatever else (garlic powder, basil, oregano) to taste.  Next, put your pita wedges in the oven at 350 degrees Fahrenheit for about 10-20 minutes, depending on your oven.  Check on them every so often to make sure they aren't burning, and flip them about half way through.

Items not dumpstered or donated: Olive oil, spices, tahini

June 5, 2012

Tofu Stir-Fry

Surprisingly enough, I made this 4 or 5 times before I was able to nab a picture of it. Why? Probably because I eat it so quickly.

So, the cool thing about stir fries is that they are really easy to make and you can use basically any protein (I dumpster tofu most often) and any vegetables that you have on hand or froze.  It's especially good for mixing frozen veggies with fresh, since it hides the freezer taste that sometimes accompanies veggies that have been in the freezer a little too long. It's a dumpster diver's paradise.  The stir fry below features marinated tofu, previously frozen green beans, orange bell pepper, corn, zucchini, and red onion.


TOFU (or meat) MARINADE

<u>Ingredients:</u>
- 1 block extra-firm tofu - best when previously frozen, thawed, and then pressed to get out all the liquid with paper towels (I'll cut it up first and then squeeze it to get out even more moisture before marinating it)
- 4 Tbsp soy sauce
- 2 Tbsp Mirin (find it in the Asian section of your supermarket - it's pretty much a dumpster chupacabra.  Don't hold your breath for this ingredient)
- 2 Tbsp Rice vinegar (same as the mirin)
- 1 Tbsp honey (vegans can use agave nectar or some other sweetener)
- 2 Tbsp grated ginger
- 2 tsp toasted sesame oil (I've dumpstered this once)
- 4 cloves garlic
- 1/2 cup onion, chopped
- 1 tsp sririacha sauce (or other hot chili sauce you have - more or less depending on how spicy you want it)

- Scallions (optional)

Thoroughly mix all these ingredients, then fold the tofu into it so it's liberally covered with everything.  Let it sit for a minimum of 20 minutes (time to cut your veggies) or overnight in the fridge.

ACTUAL STIR-FRY

<u>Ingredients:</u>
- 2 tbsp canola, safflower, or vegetable oil (I like using veggie oil the best)
- VEGGIES

Put oil in a pan or wok.
Get your pan or wok super-hot.
Put in your marinated tofu - you want a browning sear on the outside, but you don't want it to burn.  Stir fry for about 2 minutes, making sure each side gets browned (otherwise the tofu is in danger of falling apart).  Then, push it up to the side of the wok (if you're using a pan, just shift it to the outside edge). 
Add your veggies in the order of which take the longest to cook (carrots, mushrooms, peppers, bok choy stems, etc.) to whichever take the shortest (frozen pre-cooked veggies, corn, bok choy leaves, etc.). 
Once they cook up a bit, add the remainder of your marinade for extra flavor.  Keep cooking until the veggies are cooked, but still have a bit of crunch (taste testing is a great way to tell if they're ready).

You can eat a stir-fry straight (I do this), or make it last a little longer by putting it over rice or pasta.  It's a large initial investment of buying ingredients from the grocery store, but once you buy those basics (which are all pretty cheap), they last you MANY, MANY more meals, so it's worth it.

Items not dumpstered or donated: Ginger, garlic, sesame oil, mirin, rice vinegar, vegetable oil

May 29, 2012

Thai Mushroom Ginger Coconut Curry


I first ate this dish when I was living in Prague.  My Danish friend and schoolmate Nicolai had me over for dinner, and was trying to explain to me how to make the dish since I thought it was so delicious.  Unfortunately, he didn't know the words for some of the mushroom types, but I eventually deciphered his recipe, which is actually quite simple once you know what mushrooms you're looking for.

Very rarely will you dumpster ALL the mushrooms that are in this soup, so don't feel horrible if you're missing some.  I just lucked out and happened to dumpster most of the ingredients prior to making it.

Ingredients:
- 1/2 pkg white mushrooms
- 1 pkg shitake mushrooms
- 1/2 pkg baby bella mushrooms
- 1 pkg oyster mushrooms
- 1 yellow onion
- As much ginger as your puny mouth can handle
- 1-3 cloves garlic (you can do more if you want)
- A handful of 3-minute noodles (rice noodles or ramen are ideal, but I've used spaghetti and it's worked out fine - spaghetti is pictured above since I was saving my rice noodles for a batch of pho)
- 1 can sweetened coconut milk (If it's unsweetened, just add a teaspoon or two of sugar) (coconut milk is a rare but exciting dumpster find in my experience)
- Water
- Salt & pepper to taste
- Fresh basil
- Fresh cilantro (optional)
- Green or red curry paste (optional)

Cut up the ginger into very small chunks (but don't grate it or mince it).  Throw pieces into about 2-3 cups of boiling water for 15 minutes (you don't want it all to evaporate, though or else you'll lose the gingery flavor the water takes on).
ADD SALT.  This step is important.  If you don't, your mushrooms and pasta won't be as flavorful.
Add your onion, garlic, and mushrooms to the water and let it reduce a little bit - until there's about 1 cup left.
Next, add coconut milk and bring to a low simmer again.  If you're using real noodles vs. quickly cooking ones, you'll need to bring the liquid to a bit more of a boil.
Add your noodles.  If you're using real noodles, cook until the noodles are tender.  Otherwise, just drop your ramen or rice noodles in for about a minute, then take it off the heat.
Add to taste - go overboard on the basil and add maybe just a teaspoon of green curry for the best results.

Ingredients not dumpstered or donated: Ginger, salt & pepper

May 22, 2012

Zucchini Noodles


My favorite vegan/raw food restaurant does a mean zucchini noodle dish that I'm super into.  So, when I dumpstered 5 zucchini and didn't feel like making zucchini bread or ratatouille, I decided to try making zucchini noodles for the first time instead.

<u>Ingredients:</u>
- 4 zucchini
- flavorful sauce of some sort (I used my pesto cream sauce recipe, but substituted peanuts and a little sesame oil in my pesto instead of cashews, since that's what I had)

Zucchini noodles are painfully easy to make.  There are cool contraptions you can buy to make it look more like pasta, but you basically just need a vegetable peeler and some time to accomplish a more fettuccine-type noodle.  You peel the skin off, then just keep peeling around the whole zucchini longways until you get to the seeds at the core.  At that point, you can cut the core up for a salad, stir fry, or ratatouille so you're using the vegetable in more ways than one!

Once you've made the zucchini noodles according to the directions above, you can make up some kind of sauce (I made a pesto cream sauce to keep it in the raw food category.  If you're vegan, you could just do pesto plus a tomato or something).  It's a pretty flavorful dish.

One thing to mention, though - the zucchini noodles lose their moisture if you salt them and leave them in the fridge over time, so try to eat them all up after one or two meals or they can get kind of gross...

Items not dumpstered or donated: cream, sesame oil, garlic

April 13, 2012

Eggplant Fritters


Holy shit these tasted amazing.

I admitted to being borderline obsessed with cooking shows in an earlier recipe where I payed homage to Paula Deen, but here's another shout-out to a true OG: Martha Stewart.

Ok, so she's kind of a soulless, lifeless, consumerist, insider-trading demon, but this recipe (http://www.marthastewart.com/338843/eggplant-fritters?center=276955&gallery=274258&slide=262966) for eggplant fritters rocked my world. Go try them immediately. Like really - right now. That pact she made with the devil must've worked out, because DAMN can that woman cook up some eggplant.

I ended up forgoing the frisee salad and balsamic vinegar. instead, I opted to put one of these in a pita to take to work (good choice), but they're fine by themselves or on a salad too.

Items not dumpstered or donated: Olive oil, garlic, spices/herbs (some from garden), Parmesan

March 28, 2012

Ratatouille


One of my favorite things to do with squash and zucchini is make ratatouille with it. Ratatouille is traditionally a rustic French dish that packs a lot of flavor and is considered an art to execute perfectly. The dish has become a hallmark of lauded French chefs, and can make or break a restaurant (they even made a movie about it).

My Mom made a version of it when I was growing up that was far from haute cuisine - It normally consisted of cooked veggies with some kind of Ragu sauce thrown over it. The fact that my Mom called it "ratatouille" probably would've made Julia Child turn over in her grave, but it still got me to eat greens I otherwise would've skipped.

So, there's definitely a ratatouille spectrum out there that you can get creative with. Ratatouille can take a few minutes or a few hours, depending on how fancy you want to get with it. I'm going to give you a pretty basic (i.e. non-traditional) version of it to try. If you like that, I'd suggest googling more extreme recipes.

Now, one major difference between the ratatouille that I make and a traditional one: 99% of traditional ratatouille recipes include eggplant. Mine doesn't. Don't get me wrong, I love eggplant, I just prefer to use eggplant as the main component of a dish instead of as a supporting character. A lot of traditional ratatouilles also use alcohol and take a long time to cook down. I don't always have time for that.

And so, on to the recipes. Both are fast, but taste a bit different since one uses a home made veloute-like sauce (with stock, butter, and flour) and the other uses previously canned tomato sauce. I'll give you the option to choose your own adventure in a second...

Ingredients:
- Squash
- Zucchini
- Onion
- 2 tbsp Butter or Olive oil
- Tomato (optional)
- Eggplant (optional)
- Lemon, juiced (optional)
- Flour (optional)
- Chicken or Vegetable stock (optional)
- Tomato sauce (optional)
- Salt & pepper & parsley to taste

Throw all your favorite chopped veggies into a pan with some butter (olive oil if you're vegan) on medium heat with some salt and pepper and cook until everything's soft.

Here's where the 2 possibilities diverge...choice one is a lemon veloute sauce (one of the five French mother sauces) that requires SLIGHTLY more work, and choice two is over in another 30 seconds...

1) Add about a half cup of stock (chicken works best in my opinion, but veggie works too), turn your heat to medium-high, and let it boil down just a little. Take a tablespoon of flour (maybe a teeny bit more than that) and sprinkle slowly into your sauce, stirring the whole time to thicken it up. When everything's sticking together pretty well, add the juice from 1/2 to a full lemon. Continue stirring, taste it, add some fresh parsley, and you're finished. (This option is the one pictured above, with a tomato in there, which adds to the sauce as well).

2) Open a jar/can/whatever of tomato sauce (bonus points if it's home made and home canned), pour just enough in the pan to cover your vegetables until the sauce heats up, taste it to see if it needs anymore salt or pepper and you're finished.

This can be a side dish or put over rice or noodles for a heartier meal.

Items not dumpstered or donated: Butter/olive oil, Salt/Pepper

March 21, 2012

Vegan Banana Coconut Milk "Ice Cream"


My friend Gerry served this at a dinner party. I was so jealous I didn't get any (it went fast) that I decided to try my hand at making a batch of my own! This is a great way to use up bananas that went straight into the freezer when you dumpstered them. Also, it's a healthy dessert since there's no added sugar and potassium galore! Now that the weather is getting warmer, I don't feel quite so bad about posting an "ice cream" recipe...there's a few more sorbets coming up in the future too...

Ingredients:
- 6 bananas, pre-frozen
- 1 can coconut milk (I hardly ever dumpster this stuff, but I got a few dented cans/boxes recently, which got me really excited!)

Stick it all in a blender until it's smooth-ish (no more banana chunks). Stick it in a container. Stick it in the freezer in an air-tight container. THE END. Makes roughly 1 pint.

When I went through my pint, I would drizzle a little honey and made a blackberry reduction (literally just sticking blackberries on the stove and cooking off the liquid until it's a sauce. You can easily do this with pretty much any berry) to put on top of it with some mint since I was eating this stuff for a long time and wanted to spice it up, but it's really nice plain too, or with a little nutmeg.

A warning about not eating the "ice cream" right when you make it: this stuff hardens up like a rock in the freezer since there's no added sugar or liqueur (the stuff that makes sorbets easily scoop-able), so you'll probably want to leave it out to thaw at the beginning of dinner so it's scoop-able by the time dessert hits. I also had some luck with putting it in the microwave to thaw it out, but that method was less reliable.

Items not dumpstered or donated: ZERO!

March 14, 2012

Pasta Bakes


Pasta bakes are all-encompassing. They make enough food for an army (or you for a week), are super easy, and clean your fridge of pretty much everything. That, and they're pretty tasty.

In the pasta bake above, I used:
- Pasta
- Spicy frozen breakfast sausage
- Mozzarella cheese
- Parmesan cheese
- Tomato sauce
- Jalapeno Pepper
- Onion
- Red bell pepper
- Spices to taste (I used basil, oregano, salt & pepper)

Basically, you brown your meat (if you don't want to be a vegetarian about it), pre-cook your veggies a bit in olive oil (or the meat juices), boil your pasta, and stick it all in a tin-foil lined pan with some sauce and spices.

Now, stick the pan in the oven (at about 350-400 degrees Farenheit) for 15-20 minutes to let the cheese melt and get golden brown.

Now you have leftovers to take to work for the next millennium.

Items not dumpstered: Mozzarella cheese, parmesean cheese, olive oil, herbs (from garden), salt/pepper

February 27, 2012

Fried Plantains & Plantain Chips

I lived for a time in La Fortuna, Costa Rica, a small to medium-sized tourist town next to a volcano (volcan Arenal), a very large lake, and a very famous waterfall. I was there fulfilling my near lifelong dream of working in the rain forest as a zipline canopy tour guide. My life there ended up being much less and much more than I had initially imagined. I lived in a small boarding house room with concrete walls and a tin roof. I loved eating in town since the open air "kitchen" in the boarding house was comprised of a sink, a propane stove that got stolen when one of the other tenants skipped town about half way through my stay, and a refrigerator that was never plugged in, therefore serving as a place to store food away from bugs, but not really a place to keep food cold. Needless to say, it was hard to cook food in that kitchen.

Many of the restaurants in town were expensive tourist traps, but my two favorites were called "sodas." Basically, a soda is the Costa Rican equivalent of a soul food joint. It serves good local food for cheap. One of the sodas (pictured above) was on my way to work in the jungle and served the best hamburger I've had in my entire life (the man pointed to a cow in the field and basically said "you're eating one of those. we killed it a few days ago"). The other was on the main street going through town, right on the plaza (town square). It was here that I ate my first plantain, fried up as a side dish with some beef tongue and rice.

To say I love fried plantains would be understating the truth. Every time I think about, let alone eat fried plantains, I'm transported back to the Soda a la Parada in the heart of La Fortuna, looking out onto the street, trying to overhear and translate conversations at neighboring tables, enjoying the humidity, and missing home.

This was the first time I ever dumpstered plantains, so I was obviously pretty elated.


FRIED PLANTAINS or PLANTAIN CHIPS

Ingredients:
- 1 plantain
- 1/2 cup(ish) cooking oil - I used safflower because I had it leftover from an old roommate, but I'd probably use veggie oil normally. Olive oil or canola is fine, but it will make the taste a little heavier.

Heat your oil in a pan.
Peel your plantain - the browner the plantain skin, the sweeter it will taste when fried up. If the skin is green at all, it will taste a little starchier.
Cut slices a little thinner than 1". (If you want crispy chips, slice them SUPER thin).
When the oil is hot enough that it spits at you when you sprinkle water on it, add your plantain slices. The oil should come about half way up your plantains.
After a few minutes, flip them over. They should have browned but not burned. This will make the outsides nice and crispy.
When both sides are browned, move your slices to a paper towel to drain some of the oil off.
Enjoy!

Items not dumpstered or donated: ZERO!

January 30, 2012

Braised Endives


I had never cooked with Belgian endives before (not to be confused with the curly endive, which has crazy leaves). My friend Kevin showed me this recipe that was in this awesome cookbook called Canal House.

BRAISED ENDIVES

Ingredients:
- 3 belgian endives (I had two white, one red)
- 1/2 cup chicken (or vegetable) stock
- 2 tbsp butter
- Salt & pepper to taste

Melt butter in pan on high heat.
Brown endives on all sides (this part is really important or else they won't caramelize and will taste bitter later!)
Pour stock in the pan. Once it's been brought to a boil, turn the heat down to simmer.
Cover the pan and braise for 30-40 min (I ended up going closer to 40 min to make sure they were cooked through).
Uncover, turn the heat back up to medium-high and reduce the pan juices.
Serve.

Endives are naturally pretty bitter. If you caramelize them enough and cook them long enough, this should offset the bitterness by a lot. However, they'll still be a little bitter. Don't say I didn't warn you!

Items not dumpstered or donated: Chicken stock, butter

January 23, 2012

Kale Chips

So, I love kale. This is not a secret. It's really good for you and tastes amazing. It turns out, my friend Justin ALSO loves kale. He gave me a sticker from this website that lives on my tea thermos now. He also brought kale chips to the climbing gym one day to share. A bunch of the kids that I coach tried them with varied reactions. Some thought they were the weirdest thing ever, some couldn't get enough of them and went back for seconds and thirds.

In my experience, this volatile range of emotions is typical for folks trying kale for the first time. Some people just aren't used to its slightly bitter flavor. Still, there are ways to cook it where it's not as bitter as it's cracked up to be. Kale chips are often cited as a "great way for kids to eat their vegetables" because they have a consistency and flavor similar to a potato chip...but aren't deep fried in oil and are much healthier for you.

I had never made kale chips before, so I asked for Justin's recipe. I had planned to munch on them as a snack throughout the week, but unfortunately I ate them all within an hour of making them...they were just too good. Oops?

The other bunch of kale I dumpstered from the same trip I used to make my sweet & savory kale for dinner this week. In hindsight, I probably should've just made more kale chips...omnomnom.

KALE CHIPS

Ingredients:
- 1 bunch kale
- A few tablespoons olive oil (enough to coat the kale)
- Salt to taste
- Red pepper flakes & garlic powder to taste (optional)

Preheat the oven to 300 degrees Fahrenheit.
Cover a cookie sheet in tin foil.
Rip kale into about 2-3 inch pieces, removing it from the stalk and placing the pieces in a bowl. Note - I really like to eat the stalks raw while I'm preparing the rest of the kale chips. They're a sweet, yummy snack that're a little like the texture of raw asparagus in your mouth (which I love). So many people throw out the stalks instead of cooking them for a little longer than the leaves or eating them straight. That's wasteful and stupid.
Pour enough olive oil in the bowl so that when you toss the kale with your hand, it coats everything.
Put however much salt you want in there with the kale. I also added garlic salt and crushed red pepper to my kale chips as an experiment for some extra flavor, but plain salt & pepper is also really great.
Another note: If you're suddenly struck by laziness and don't want to make kale chips, the oil-doused kale is actually incredibly delicious at this point before you stick it in the oven. I could probably eat the kale just like this and be completely happy...but, if you want kale chips, continue...
Place kale pieces in rows on your cookie sheet (you'll probably need more than one). Be careful that they don't touch at their edges.
Stick them in the oven for 20 minutes, taking them out about half way through to flip the chips over.
Watch your chips carefully. They should brown at their edges, but not burn. If they need a few extra minutes, let them hang out in the oven. I took one of my batches out too early and they were a little oily/chewy still, which still tasted fine but wasn't very crispy and chip-like.
Store in a tupperware so they don't crumble. They don't need to be refrigerated and will last a few weeks to a month on the shelf.

Items not dumpstered or donated: Olive oil, spices.

December 27, 2011

Vegan Tofu Sloppy Joe


I rarely dumpster tofu, so I was extra-excited when I did recently. I haven't really cooked regularly with tofu since I was in college, but this is a pretty easy tofu recipe for beginners (and super-easy if you want a vegan barbeque option). So, I re-acclimated pretty fast.

VEGAN TOFU SLOPPY JOES

Ingredients:
- 1 lb. extra-firm tofu, pressed (basically, you press all the liquid out of it. It's easier if you freeze it first then re-thaw it) (those who are new to tofu, YES the consistency matters. It will be labeled on the packaging).
- 1 tomato, diced
- 2-3 cloves of garlic, minced
- Soy sauce to taste (I used a few tablespoons)
- 1 tbsp olive oil
- 1/2 onion, finely diced
- 1/4 cup ketchup (or you can use tomato paste/tomato sauce and apple cider vinegar)
- 1 tbsp brown mustard (optional)
- Cumin, sugar, cayenne, salt, & pepper to taste - be careful with the salt since the soy sauce has salt in it too...
- Some kind of bread or bun (I used a ciabbata roll sliced in half)

Press and crush up the tofu.
Put olive oil in a pan and soften your onions and garlic on medium heat.
Throw in the tofu and soy sauce on high heat for 3-5 minutes (until it's kinda golden brown).
Throw in the tomatoes, turn to medium.
Add the ketchup, mustard, and spices until it all tastes delicious and something like a Sloppy Joe should.
Simmer for at least 10 minutes so the flavors can meld and work their magic.
Donezo!

I ate this as leftovers at work, and I had all these hardcore carnivores asking me what I'd made because it smelled so good! Epic win!

Items not donated or dumpstered: Olive oil, spices, mustard

November 20, 2011

Sweet Potato Fries with Spicy Garlic Aoli


I made this recipe to bring to Thanksgiving at my Dad's last year. My nieces and nephews (all under the age of 12 and averse to veggies) loved these, and the aoli elevated the dish so that all the adults were impressed with my "culinary expertise." My family asked me to make these again this year, so I figured I'd share the recipe. At home, I'll usually pair these with a black bean burger or my quinoa burgers (and put the aoli on top of the burgers too)!

SWEET POTATO FRIES WITH SPICY GARLIC AOLI

Ingredients:

Fries:
- 1 large sweet potato, peeled (don't have to peel them, but it makes them more crispy if you do. Also, a good rule of thumb is to ration about 1 sweet potato per person if you're cooking for more than just yourself or a friend).
- 2 tbsp olive oil
- Salt, pepper, paprika, and cinnamon to taste

Preheat your oven to 425 degrees Fahrenheit.
While you wait for it to heat up, peel and cut your sweet potato into 1/2" thick sticks. Try to keep really pointy ends from being there, as they burn easily.
In a ziploc bag, put in your olive oil and spices.
Throw your sweet potatoes in and give the bag a good shake so that everything covers the sweet potato (this step is especially fun if you're making this with a kid as your helper. Put on some music and shake around!).
Put your potatoes spread evenly on a baking sheet with tin foil over it.
Bake in the oven for 20-30 minutes, turning your fries over in the middle (at 10 or 15 minute mark - different ovens will take different times to make the fries crispy). When your fries begin to brown, it's time to take them out.
Dry your fries on a paper towel, add some extra salt and pepper, and serve!

You can make oven fries with regular potatoes too. Just bring down the cooking time to like 10-20 minutes because regular potatoes will burn more easily.

Aoli (don't use this if you're vegan unless you have vegan mayonnaise):
- 1/3 cup Mayonnaise (bonus points if it's homemade)
- 1-2 tbsp sriracha sauce
- 2-3 cloves garlic
- 1 tsp Lemon or lime juice (I used lemon)
- pepper & salt to taste (I used about 1 tsp pepper and 1-2 tsp salt)
- 1-3 tbsp cayenne pepper (depending on how spicy you like it)
- 1/2 tsp cumin

So, the funny thing about aoli is: it's just a fancy word for mayonnaise. You put stuff in it to make it taste better, but it's usually just mayonnaise (yeah - all those fancy restaurants that have "aoli" somewhere on the menu? It's because they're too chicken to just call it what it is so you're actually willing to pay more money and think it's healthy or high-class or something).

To make it, you just mix all the ingredients together until it tastes good. Up the quantities of everything if you want more aoli to dip into or if you're putting it on top of a burger.

Items not donated or dumpstered: olive oil, garlic, spices, sriracha sauce

November 10, 2011

Vegan Radish Greens Soup

It's happened.

SOUP MONTH has returned. As it's gotten colder, I've become obsessed with soups again. I forgot how easy and delicious they are.

So, quick Soup 101:

Almost all European-style savory soups begin with what's called a mirepoix (a French word pronounced meer-ah-pwah), which basically means onions, celery, and carrots sauteed with butter or oil (and usually with some combination of spices added). They create this bangin' set of flavors that create the base to most soups, stocks, and sauces. Without them, your soup just won't taste as hearty unless you're making an Asian-style soup or curry, in which case the flavors are going to be coming from other ingredients (like ginger, chili, curry, garlic, etc).

Next, you just add your main ingredients to your mirepoix, add some water or stock, blend it up, and go. Super easy.

So, this next dish isn't 100% from the dumpster because I had the chance to go to a pick-your-own farm near my house. I ended up getting pumpkins for my curried pumpkin and potato soup (and to put out at Halloween for the kiddies), sweet potatoes, beets, broccoli, and a bunch of daikon radishes, which I had never used before.

I ended up using all the daikon radishes (typically used in Asian dishes) for my first experiments with kimchee (a Korean fermented snack/condiment) and pho (a Vietnamese soup)...however, I was left with a bunch of daikon radish greens that I didn't know how to use. I came up with this recipe, which you can actually apply to a lot of different types of greens if you're over-stocked. The radish greens are especially great, though, because they have a nice peppery flavor to them already. Plus, I had all the ingredients for soup that I had recently dumpstered, so this was a perfect solution for using them.

Unfortunately, there's no picture for this soup because I threw it in a container to take to work right after making it...and then promptly ate all of it for dinner with some bread. Several people saw me eating it and asked for the recipe, so I figured it was worth the share. Plus, my boss is really allergic to dairy, so he appreciated the fact that it was vegan (bonus points)!

VEGAN RADISH GREENS SOUP

This soup makes like 5-6 cups with these proportions, so you'd have to double or triple them if you were going to make a lot for a family:

Ingredients:

- 2-3 tbsp olive oil or butter (vegan with oil)
- 1 medium-large potato
- 1 red onion
- 2 long celery stalks
- 1 medium carrot
- 4 cups daikon radish greens (or chard, kale, spinach or some other kind of yummy leafy green - if it's beet or radish greens, there'll be more flavor since both of those are kind of peppery. For other kinds of greens, you'll probably need to adjust the seasoning of the dish)
- 1-2 red or daikon radishes (optional - I didn't use them because I had used them all up in my kimchee)
- 2 cloves garlic
- 1 tbsp fresh sage
- 1 tsp fresh parsley
- 1 tsp fresh thyme
- Salt & pepper to taste
- 1 bay leaf (remember to take it out before you blend it up)
- 4 cups chicken or vegetable stock or broth, warmed up (I used 4 cups water with chicken bouillon because I was out of everything else)

On medium-high heat, heat up the onions, celery, carrots for a few minutes. Add the potatoes, radish greens, garlic, and spices.
Warm up the broth in a separate pot while the other stuff is cooking.
Add the broth, then boil everything. Turn to medium-low and simmer for 5-20 minutes.
Remove the bay leaf.
Put everything into a blender. DONE.

Ingredients not dumpstered, donated, or picked/grown myself: Olive oil/butter, bouillon cubes, bay leaf, garlic, salt/pepper

November 3, 2011

Vegan Red Pepper & Tomato Soup

It snowed. At the end of October. Unfortunately, I was out in it more than I had wanted to be all day (if you know me you know that cold weather is not my cup of tea). So, when I got home after a full day of work I needed something to warm me up - badly.

I ended up starting a cooking session that lasted a few hours (my housemates were at a Halloween party, so I had the quiet, peaceful house to myself). I ended up using almost all the food that was about to go bad in my fridge, prolonging the life of it a little longer.

To warm up, I decided to make a soup I'd never tried before from scratch, using as many ingredients as I could from my fridge. I had a lot of tomatoes, so I decided to go with tomato soup. It turned out I had a red pepper too, so I threw that in there as well.

Soup in general is an awesome dumpster chef's tool because you can freeze most soup for a few weeks up to a few months (depending on if it has dairy, what's in it, etc). This makes it pretty easy to polish off the rest of the dumpstered food in your fridge before it spoils. Plus, reheating your frozen soup in the microwave takes no time at all on days where you just want to eat without any prep work because you're freaking hungry.

RED PEPPER & TOMATO SOUP

Ingredients:

- 1 large tomato
- 3 small roma tomatoes
- 1 medium red pepper
- 2 long stalks celery
- 1/2 large red onion
- 2 tbsp olive oil
- 3/4 cup chicken or vegetable stock (bouillon is also fine to use if you don't have any previously frozen or bought stock)
- A large bunch of fresh basil
- 2-3 cloves of garlic
- 1 bay leaf
- Ground cumin (2 dashes), nutmeg (2 dashes), salt (a crap-ton), pepper (a smaller crap-ton), yellow curry powder (very small pinch), cayenne pepper (2-4 dashes), & cinnamon (very small pinch) to taste.

Makes about 2 dinner-sized servings.

Put olive oil in the bottom of a pan. Heat onions, celery, red peppers (you can roast your pepper ahead of time, which can give it extra flavor), tomatoes, and garlic at medium-high heat until they all soften up (you can leave it covered to keep some of the moisture in).
Add the bay leaf and a bit of salt.
Simmer for 20 minutes.
Add basil about 5 minutes before you take the pan off the heat.
Remove bay leaf (it will suck if you don't).

Put it all in a blender. Blend until smooth.
Put the mixture back into a pot and put it on medium-low heat.
Heat up chicken or vegetable stock (if you use vegetable stock, this recipe is vegan). Add it to your pot and thoroughly stir it in.
Add your spices to flavor the soup as you like. I like mine with a BIG punch of flavor (and the spiciness gives a little heat on those cold days), so I added a bunch (quantities delineated above). Garnish your soup with a little sprig of fresh basil and you're set! I also like to eat my soup with a piece of buttered toasty bread so I can dip it in the soup and savor it even longer.

Once everything's finished, it's time to curl up with the cat and savor the soup's warmth before I'm forced back out into the cold again.

Items not dumpstered or donated: Olive oil, garlic, basil (from garden), stock, all other spices, butter (on bread)

October 28, 2011

Broccoli Cheddar Bake


So, I've always had this idea in my head from childhood that broccoli and cheddar cheese taste good together. Yet, I usually just steam broccoli, throw some butter and salt on it and call it a day (which is essentially the first step of this recipe, so if you want to do that, you can).

I'm usually very anti-anything-remotely-resembling-casserole since it reminds me of '50s housewives (gross) and overly processed leftovers (double gross). Still, I decided to try my own rendition of one, which turned out pretty tasty. It's not as healthy as I'd like, but I think it's definitely better than the very (surprisingly) popular cheese-whiz/onion powder/frozen broccoli versions I found online. It was kind of an experiment, but for a pretty minimal amount of effort I came out with enough food to last me for a week's worth of lunches. Plus, I was right - broccoli and cheddar do taste great together.

BROCCOLI CHEDDAR BAKE

Ingredients:

- 3 heads of broccoli, cut into small florets (use the stem too) (you can use previously dumpstered and frozen broccoli too, but it may not taste as good as the fresh stuff)
- 1 small white onion, diced
- 2 long stalks celery, chopped
- 2 cloves garlic, minced
- 2 tbsp chopped fresh rosemary and/or thyme (optional)
- 1 cup mayonaise (bonus if home-made)
- 1 cup sour cream
- 2 cups shredded cheddar cheese
- 2 cups uncooked rice
- 1 stick unsalted butter, melted
- 1.5 cups Italian-spiced bread crumbs (extra points if home-made from dumpstered bread) - you can also use crushed up crackers like ritz crackers, which will give it a different but good flavor.
- 1 can or 2 cups leftover cooked chicken (optional - I didn't use this, but it could add some extra protein)
- Salt & pepper to taste

Normally, people use cream cheese or a can of condensed cream of mushroom (or chicken) soup instead of my sour cream/mayo combination, but they were the only ingredients I had on hand and I was hungry.

Preheat your oven to 350 degrees Fahrenheit.

Step One: Steam your broccoli

Put a weird thingy that looks like this (called a steamer?) in the bottom of a pot with enough water underneath so it barely shows:
Throw your broccoli on top. Turn the stove to medium-high, then cover the pot (be careful that the water doesn't all evaporate or the bottom of your pot will burn). Steam until broccoli is bright green and a fork goes through pretty easily. If you're lazy, you can just throw your cheddar cheese (or butter with some salt) on top and call it a day. This makes a great side dish by itself.

If you're bold enough to continue into the land of house-wifery, then continue to...

Step Two: Put it all together

While you're waiting for the broccoli to steam, mix the onion, celery, garlic, sour cream, rosemary, and mayonnaise in a bowl.
Once the broccoli is finished, dump it onto the bottom of a glass or pyrex baking pan (9"x12" works well).
Evenly cover it in the sour cream/veggie mixture.
Sprinkle your shredded cheddar over the top.
In a separate bowl, mix your melted butter and bread crumbs into a thicker mixture. Sprinkle this on top as well.

Step Three: Wait and make your rice

Throw it in the oven for 30 minutes while you make some rice (it's pretty easy - just read the side of the bag or box of rice - give yourself about 40-50 minutes for it to turn out well, so maybe start boiling your water around when your broccoli is done steaming so everything is done at the same time).

When it comes out, it'll look kind of like this:
Serve the bake by itself or for some added heartiness, put a few scoops of rice underneath! I used brown rice to make the dish last EVEN LONGER.

Items not donated or dumpstered: Butter, sour cream, mayonnaise, garlic, rosemary (from garden), salt, pepper

October 5, 2011

Granola with Dried Cherries

Driving to a coffee shop to hang out with my Stepmom Maryann, we got to talking about what I had recently dumpstered and how I was going to use it...

"I have no idea what I'm going to do with 6 packages of cherries. Maybe freeze them for smoothies or make cobbler? I have to think fast..."
"I'll take a package," Maryann offered.
"What?"
"I'll take a package" she repeated.
"Wait. Since when are you okay with eating dumpstered food?"
"Since now, I guess. I love cherries. I've been really curious about your dumpstering. Your Dad isn't into it, but I'd love to go with you sometime and see what it's all about as long as we don't get arrested. It's like an adventure...and we don't have to tell your father where the food came from."
"It's mostly late at night..."
"That's okay. I'll take a nap or something."

This is REALLY exciting for me. One of my parents interested in DUMPSTERING? Up until now, the only people I've known who dumpster are under the age of 35. For some reason, I had just assumed older people weren't into it. I assumed they have the luxury of affording store-bought food and aren't as invested about landfill usage (or something silly like that).

So, my mind is blown and I'm completely looking forward to opening the world of dumpstering up to my Stepmom. Keep your eyes peeled for an ultra action-packed SENIOR CITIZEN edition of Trash to Table coming up soon!

In the mean time, here's what my Stepmom Maryann recommended I do with my extra cherries - dry them out. Dehydrating fruits and vegetables is a great way to make them last. In the case of cherries, you can add them to granola, cereal, or trail mix, or just munch on them for a snack! I ended up putting them in some home made granola.

DRIED CHERRIES

Ingredients:

- However many cherries you have

Cut your cherries in half (composting the pits) and put them skin side down on a baking sheet covered with tin foil or an oven rack where the cherries won't fall through.
I have a confectioner's oven (which is ideal for dehydrating foods), since it keeps a constant temperature and flow of air going through the oven. However, if you don't have one, you'll need to get a very accurate thermometer for your oven and keep it at a constant temperature of 135 degrees Fahrenheit.
Keep the cherries in there for 8-10 hours (overnight is usually a safe bet if you rotate trays and make sure things aren't burning about halfway through the night).

GRANOLA

Granola is great for breakfast, or you can add chocolate chips and turn it into trail mix (I did this to take on an overnight climbing job and it was awesome).

Ingredients:
- 4 cups rolled oats
- 2 cups flax seed meal
- 1/2 cup sunflower seeds (unsalted, unroasted, shelled)
- 1 cup almond slices
- 1/2 cup pecans (chopped)
- 1/2 cup cashews (chopped)
- 1 tsp salt
- 1/4 cup brown sugar
- 2 tbsp maple syrup
- 1/3 cup honey
- 1/2 cup vegetable oil
- 1.5 tsp cinnamon
- 2 tsp vanilla extract
- 1 + 1/4 cup raisins and/or dried cranberries
- 2 cups shredded coconut
- A sprinkle of nutritional yeast (optional)
- (I also added some leftover toasted pumpkin seeds I had)


I ended up putting freshly dumpstered strawberries on top of my granola too!

So, start by preheating your oven to 325 degrees Fahrenheit and covering a large baking sheet with tin foil.
Next, combine all the nuts, seeds, oats, and flax seed meal.
In a small pot, combine all the wet ingredients as well as the salt, brown sugar, and cinnamon. Bring it to a boil at around medium heat, then turn the burner off IMMEDIATELY.
Pour it over the nut mixture and stir it around, then spread the stuff on your baking sheet.
Bake it in the oven for around 20-30 minutes, until it's toasted and a bit crispy, maybe stirring once or twice along the way. Take it out to cool down (it will get crispier as it cools).
Stir in your raisins and dried cherries. DONE.
Store in a cool, dry place.

Items not dumpstered or donated: Rolled oats (from the Beet Food Co-Op), sunflower seeds, almonds, honey, spices, vanilla extract, coconut

September 27, 2011

Curried Sweet Potatoes

My good friend Kendall and I made this dish for a birthday pot-luck a few months back which mostly had vegetarians and vegans in attendance (we also made some vegan jalapeno corn bread with a spicy mango-ginger chutney, which I'll hopefully post the recipe for soon). Unfortunately, Kendall and I don't get to see each other as often as we'd like to since we live kind of far away from each other and are both incredibly busy folks. Making this dish doesn't require a lot of prep time, and you have to wait around 40 minutes for these to finish in the oven. This leaves ample time to catch up and commune with your friends, which is exactly what Kendall and I did before heading to the party. Our dishes were gone minutes after we placed them on the table, and folks lamented that they couldn't come back for seconds. As the demi-god Charlie Sheen would say: winning.

I re-made this dish after dumpstering sweet potatoes the other day, and it was just as good (and easy) as the first time. This time, I ended up hanging out with my housemate (who was about to move to NY) while I waited for the sweet potatoes to cook. I got a little engrossed in the conversation, so the potatoes got left in the oven a bit too long, which is why they look a little TOO crispy in the photo above. In the end, they still tasted yummy and I got to have a great time talking to my roommate (and friend) before he left.

CURRIED SWEET POTATOES

Ingredients:
- Sweet potatoes
- Around 1/2 cup vegetable or olive oil (I'm pretty sure we used olive oil both times)
- Juice from 1/2-1 lemon
- Yellow curry powder (a LOT of it)
- A butt-ton of rosemary
- A healthy dose of nutmeg
- An equally healthy dose of cinnamon
- Salt & pepper to taste (I put on a lot)

Wash and cut your sweet potatoes into cubes - maybe around 1"x1". Leave the skins on for extra nutrients.
Throw everything else on your sweet potatoes and toss so the potatoes are covered.
Put them on a baking sheet covered in tin foil.
Bake in an oven at 350-400 (the higher the temperature, the crispier the outside of the sweet potatoes will get).
Take them out and turn them over a bit around half way through.
40 minutes later, and you're done. You can tell they're done if a fork goes into them easily.

Items not dumpstered or donated: Honey, spices (rosemary was from the garden)

September 19, 2011

Eggplant Parmesan


This recipe was made for me on a first date in college. We helped make it together, assembly-line style, which was a cool, interactive way to get to know each other. The guy was a vegetarian and totally won me over (with the recipe). The eggplant was perfectly cooked - not mushy or gross at all like it can be if cooked poorly. Although things didn't work out romantically between the vegetarian and I, we're still buds and I still make his Eggplant Parmesan at least once a month. I have since dated many more culinary vegetarians.

Ingredients:
- 1 large eggplant (the vegetarian told me it's better if the eggplant is uniform in shape because then the medallions cook more evenly. I've experimented with lots of different sizes and it doesn't seem to make a difference to me as long as the slices are the same height).
- 1-2 eggs (depends on size of eggplant)
- Enough flour to cover a plate (about 1 cup, maybe a little more)
- Enough Italian bread crumbs to cover a plate (about 1 cup) - bonus points for homemade dumpster bread crumbs (recipe forthcoming)
- 3/4 jar of tomato sauce (extra bonus points if it's homemade and canned from dumpstered materials)
- 2 cups of shredded skim milk mozzarella cheese
- 1.5 cups of shredded Parmesan cheese
- 2 tbsp olive oil
- Basil, oregano, salt, & pepper to taste

It's easiest to think about this recipe in terms of chunks of actions, I think...so I'll put them down as such:

CHUNK ONE: PREP

Pour flour & breadcrumbs on two separate plates so they thinly cover the surface.
Take a baking sheet and cover with aluminum foil.
Beat your egg(s) in a bowl.
Slice eggplant into about 1/4-1/2" slices.
Preheat oven to 350 degrees.
Start heating olive oil in a large pan at medium/medium-high heat (but not so high a heat that the oil will burn).

CHUNK TWO: COVERING EGGPLANT WITH YUMMY STUFF/COOKING IN THE PAN

Press your eggplant slices in flour so there's a light dusting on each side.
Next, dip the eggplant medallions into your egg, followed by pressing them into the breadcrumbs so they're evenly covered on both sides.
Once a medallion is covered with all the ingredients, throw it in your olive oil. You want a nice golden brown crisp on each side, and ultimately want a fork to barely go through your eggplant if you stick it in near the edge. That's how you know it's ready for...

CHUNK 3: PUTTING THE EGGPLANT ON YOUR BAKING SHEET

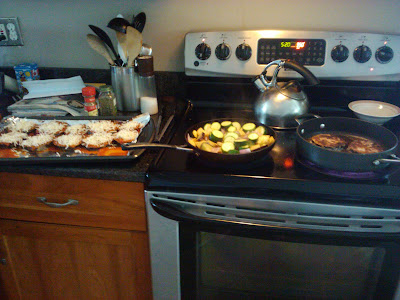
Hopefully you'll have started this next step as your eggplant medallions are cooking in the pan or else things will be really awkward (chunks 2 and 3 overlap if you're being efficient). In the picture below, you can see the eggplants cooking in the pan on the right and a few eggplant medallions ready on the baking sheet on the left, with my tomato sauce already prepped for my medallions to be placed on top of...in the middle is the beginning of my ratatouille - recipe forthcoming).


So, you take a teaspoon of sauce and put it on the baking sheet, using the bottom of the spoon to spread it around in a circle (about as large as your medallion).
Place a medallion on top.
Put another teaspoon of sauce on top of your medallion, along with any extra spices you want to add (I use a pinch of basil, oregano, sea salt, and black pepper).
Sprinkle mozzarella and Parmesan on top.

Repeat with all your medallions.

CHUNK 4: THE OVEN AND EATING

Stick that shit in the oven for about 10 minutes (as long as it takes for the cheese to melt and brown a little on the top).
Take it out and enjoy!

The magic of this dish is that the leftovers are just as amazing days later as when you first took the pan out of the oven. You can use a medallion on a burger bun for lunch at work (highly recommended), eat them as a savory late night snack cold, or you can just reheat them normally and eat some with a salad.

Items not dumpstered or donated: Flour (from the now-defunct Beet Food Co-Op), mozzarella, Parmesan, salt, pepper, egg, basil (from garden), oregano (from garden)