Showing posts with label bbq. Show all posts

February 20, 2012

Herb-encrusted Steak w/ Asparagus

Now that I've given you guys instructions for how to tell if meat is good to dumpster or not, here's a dish that involves meat!

Ingredients:
- However much asparagus you want to eat
- 1 prime steak filet
- Rosemary
- Thyme
- Garlic
- Sage
- Salt & Pepper to taste
- Lemon juice (optional)
- Olive oil or butter (optional)

So, there's two ways to do this. One is if you're actually grilling and BBQing and it's a beautiful summer's day. The other method is used when it's cold as balls and going outside includes the danger of frostbite. I've provided both options for you just in case. I usually only trust meat that I've dumpstered in the winter, so grilling isn't an option in most cases.

METHOD ONE: SUMMER

GRILLED ASPARAGUS

Drizzle with lemon juice, olive oil, and salt and pepper to taste.
Throw it on the grill until it's turned a bright, dark green and has softened a bit (test with a fork).
Donezo.

GRILLED STEAK:

Cut up all the spices and herbs and stick it on the steak for about 30 minutes, also letting the steak get to room temperature. Stick it on the grill for about 2-3 min. per side (depending on thickness) with the grill lid open. Put it on the warmer part of the grill (if you have one) with the lid closed for another 5-10 minutes. Make sure to move the steak around to get those cool perfect grill lines.

METHOD 2: WINTER

BOILED ASPARAGUS

Get a frying pan and fill it with water so it's a little higher than the height of your asparagus. Bring the water to a boil.
Toss in your asparagus. Turn it occasionally until a fork barely goes through and the asparagus gets a nice healthy green color (it shouldn't take too long).
Drain your water, add salt, pepper, and butter to your liking.

SEARED STEAK:

Use the same herb-encrusted preparation as the grilled version of this recipe. Then, on a very hot pan, sear each side of your steak for 2-4 minutes until it's brown and slightly charred. This should be enough to have your steak come out rare (that's how I like it). If you want something a little more well-done, turn the heat down and turn the steak a few more times to cook it through over a few more minutes.

Items not dumpstered or donated: Olive oil, salt & pepper, garlic, herbs (from my garden)

December 27, 2011

Vegan Tofu Sloppy Joe


I rarely dumpster tofu, so I was extra-excited when I did recently. I haven't really cooked regularly with tofu since I was in college, but this is a pretty easy tofu recipe for beginners (and super-easy if you want a vegan barbeque option). So, I re-acclimated pretty fast.

VEGAN TOFU SLOPPY JOES

Ingredients:
- 1 lb. extra-firm tofu, pressed (basically, you press all the liquid out of it. It's easier if you freeze it first then re-thaw it) (those who are new to tofu, YES the consistency matters. It will be labeled on the packaging).
- 1 tomato, diced
- 2-3 cloves of garlic, minced
- Soy sauce to taste (I used a few tablespoons)
- 1 tbsp olive oil
- 1/2 onion, finely diced
- 1/4 cup ketchup (or you can use tomato paste/tomato sauce and apple cider vinegar)
- 1 tbsp brown mustard (optional)
- Cumin, sugar, cayenne, salt, & pepper to taste - be careful with the salt since the soy sauce has salt in it too...
- Some kind of bread or bun (I used a ciabbata roll sliced in half)

Press and crush up the tofu.
Put olive oil in a pan and soften your onions and garlic on medium heat.
Throw in the tofu and soy sauce on high heat for 3-5 minutes (until it's kinda golden brown).
Throw in the tomatoes, turn to medium.
Add the ketchup, mustard, and spices until it all tastes delicious and something like a Sloppy Joe should.
Simmer for at least 10 minutes so the flavors can meld and work their magic.
Donezo!

I ate this as leftovers at work, and I had all these hardcore carnivores asking me what I'd made because it smelled so good! Epic win!

Items not donated or dumpstered: Olive oil, spices, mustard

November 20, 2011

Sweet Potato Fries with Spicy Garlic Aoli


I made this recipe to bring to Thanksgiving at my Dad's last year. My nieces and nephews (all under the age of 12 and averse to veggies) loved these, and the aoli elevated the dish so that all the adults were impressed with my "culinary expertise." My family asked me to make these again this year, so I figured I'd share the recipe. At home, I'll usually pair these with a black bean burger or my quinoa burgers (and put the aoli on top of the burgers too)!

SWEET POTATO FRIES WITH SPICY GARLIC AOLI

Ingredients:

Fries:
- 1 large sweet potato, peeled (don't have to peel them, but it makes them more crispy if you do. Also, a good rule of thumb is to ration about 1 sweet potato per person if you're cooking for more than just yourself or a friend).
- 2 tbsp olive oil
- Salt, pepper, paprika, and cinnamon to taste

Preheat your oven to 425 degrees Fahrenheit.
While you wait for it to heat up, peel and cut your sweet potato into 1/2" thick sticks. Try to keep really pointy ends from being there, as they burn easily.
In a ziploc bag, put in your olive oil and spices.
Throw your sweet potatoes in and give the bag a good shake so that everything covers the sweet potato (this step is especially fun if you're making this with a kid as your helper. Put on some music and shake around!).
Put your potatoes spread evenly on a baking sheet with tin foil over it.
Bake in the oven for 20-30 minutes, turning your fries over in the middle (at 10 or 15 minute mark - different ovens will take different times to make the fries crispy). When your fries begin to brown, it's time to take them out.
Dry your fries on a paper towel, add some extra salt and pepper, and serve!

You can make oven fries with regular potatoes too. Just bring down the cooking time to like 10-20 minutes because regular potatoes will burn more easily.

Aoli (don't use this if you're vegan unless you have vegan mayonnaise):
- 1/3 cup Mayonnaise (bonus points if it's homemade)
- 1-2 tbsp sriracha sauce
- 2-3 cloves garlic
- 1 tsp Lemon or lime juice (I used lemon)
- pepper & salt to taste (I used about 1 tsp pepper and 1-2 tsp salt)
- 1-3 tbsp cayenne pepper (depending on how spicy you like it)
- 1/2 tsp cumin

So, the funny thing about aoli is: it's just a fancy word for mayonnaise. You put stuff in it to make it taste better, but it's usually just mayonnaise (yeah - all those fancy restaurants that have "aoli" somewhere on the menu? It's because they're too chicken to just call it what it is so you're actually willing to pay more money and think it's healthy or high-class or something).

To make it, you just mix all the ingredients together until it tastes good. Up the quantities of everything if you want more aoli to dip into or if you're putting it on top of a burger.

Items not donated or dumpstered: olive oil, garlic, spices, sriracha sauce

September 4, 2011

Peach-Mango Salsa & Ginger Mojitos


Recently I had the pleasure to go through Hurricane Irene. It didn't hit us very hard in Maryland, but everyone was told not to go out of the house. So, while I waited for the power to go out with a friend (it never did), we made some peach-mango salsa, guacamole, and ginger mojitos, then sat down and watched Royal Tenenbaums as the wind and rain raged outside.

PEACH-MANGO SALSA


Ingredients:

- 3 small peaches, diced (from a large bushel given to us at work by a customer bought from a local farmer's market)
- 1 mango, diced
- 3-5 cups diced (fresh) tomatoes
- 2 cups diced white onion
- 1 clove garlic
- 1/2 - 1 jalapeno pepper - with seeds (depending on desired spiciness)
- 1/2 yellow bell pepper, diced
- Juice from 2 limes
- 1 bundle of fresh cilantro, chopped
- Salt (we needed quite a bit), black pepper, & cayenne to taste

Place tomatoes, onions, jalapeno, and bell peppers in a large pot over medium heat for 10 minutes, allowing the tomatoes to release their juices.
Add peaches & mango, then cook for an additional 5 minutes.
By this time, there should be a LOT of liquid accruing in your pot. Depending on how watery you like your salsa to be, drain as much off as you'd like. I ended up draining off about half the liquid (but kept enough to use as canning fluid for a few jars).
Add lime juice, cilantro, and extra spices.
Cool down the salsa before serving.
Can it if you'd like so you can bring it to a BBQ or pot-luck or give it as a gift to a friend. Plus, if you can it, you can enjoy the salsa in the winter when none of the ingredients are in season anymore! But BEWARE: There's not a whole bunch of acid in this recipe, so I wouldn't use the salsa after a few months - 6 at most (even if it's been properly sealed the whole time). If you want to keep the salsa longer, just add some apple cider vinegar to your mixture and it should make it last a little longer.

Items not dumpstered or donated: Garlic, cilantro (from garden), salt, black pepper, & cayenne

GINGER MOJITOS

This is my favorite drink in the world. I first encountered a ginger mojito when I was living in Prague going to film school (which is funny, since the drink is Cuban in origin). Plain mojitos were all the rage in Prague when I lived there, and the ginger spin on the drink was on the menu at this really awesome lounge/club named Radost FX (Rihanna notably shot one of her music videos there). If you're ever in Prague, I'd highly recommend hitting it up.

They make a way better ginger mojito than I ever could, but this is my meager attempt at trying to recreate it. You can also do a virgin version (that actually tastes almost exactly the same as the alcoholic one and is delicious) by just omitting the rum.

I feel badly that this recipe uses a lot of ingredients not dumpstered, but when you have SO many limes and ginger (which we had), it's a good way to use them when you're tired of using them in other ways. Plus, when there's a natural disaster, everyone seems to want a drink...

Ingredients:

- 2 shots white rum (optional)
- 1 cup club soda (add slightly more club soda for the virgin version)
- 1+ tsps minced ginger (I put in way more since I love ginger - think like 4 tsps for that extra bite to contrast the sweetness)
- 10+ fresh mint leaves (Again, I like way more for freshness, but most other recipes call for 10-12 leaves)
- Juice from 1 lime
- Lime slice to garnish
- 2-4 tsps sugar or simple syrup if you're more patient/making a big batch
- A bunch of ice (crushed for more of a tropical feel)

Muddle (basically mash together) ginger, mint, and halved lime (with rind) with a mortar & pestle or a muddler (if you don't have either of these, just put the ingredients in a small bowl or cup and use a spoon or similarly blunt object like the top of your rum bottle to mash them up).
Add this mixture to your ice, rum, and club soda.
Add simple syrup (or sugar).
Mix and enjoy!

Items not dumpstered or donated: Mint (from garden), rum, club soda

July 18, 2011

Stuffed Portabello Mushrooms

Portabello mushrooms are exciting when you dumpster them. They're usually sealed in plastic wrap with very little wrong with them (if they're baby portabellas it might be because one or two are squishy).

Stuffed portabello mushrooms are a great addition to a barbeque or pot luck, and are extremely versatile. You can use regular sized portabellos, baby ones, cremini mushrooms for a different flavor, keep the recipe vegan, vegetarian, or ULTRA MEAT styled....plus, you can add pretty much whatever you have in the fridge that you've dumpstered recently. There are a million ways to make these, but they always come out delicious regardless because portabella mushrooms are so freaking good.

I'll give my favorite combination of ingredients...my co-worker and one of my BFFs Matt has an even better rendition of this basic recipe that doesn't use tomatoes, but he told me the recipe is an ancient Chinese secret. Basically, you only get to eat his version if you are at a BBQ he's attending. So, you'll just have to settle with my version:

STUFFED PORTABELLA MUSHROOMS


Ingredients:

- 2 portabella mushroom caps, de-stemmed (unfortunately - if they aren't de-stemmed, chop up the stems and add them in with the onions)
- Handful of diced red onions
- 12 Cherry heirloom tomatoes, quartered (any tomatoes will do, though)
- Shredded mozzerella cheese (would have preferred Parmesan in there, but whatever)
- 2 slices of bacon, crumbled (optional for vegetarians)
- 1 clove garlic
- 2 tsp fresh rosemary
- 1 tsp fresh sage
- 1/2 tsp fresh thyme
- 3 tbsp olive oil
- 2 tsp soy sauce
- 1 tsp balsamic vinegar
- 2 tsp lemon juice (preferably fresh)
- Fresh ground pepper, salt, and red pepper flakes to taste
- Sprinkle of fresh parsley
- 2-3 tbsp unsalted butter or earth balance
- Italian seasoned bread crumbs (you can make them yourself from dumpstered bread if you're feeling adventurous - recipe forthcoming)

Preheat oven to 350 degrees.
Make bacon. Set aside on paper towel to be crumbled once dry.
With bacon grease still in the pan (or butter), sautee onions and tomatoes on medium-low until soft. Throw in the garlic for the last 30 seconds so it keeps its flavor.
While that's cooking, mix the olive oil, soy sauce, vinegar, lemon juice, pepper, rosemary, sage, thyme, and red pepper flakes in a bowl thoroughly. Brush the mixture onto your portabella mushroom caps (or marinate them in it if you have time to let them sit).
Once the tomato/onion/garlic mixture is done, put it aside in a bowl.
Add butter to your pan, turning the heat to medium.
Cook your portabellas, brushing your liquid mixture onto them frequently until they are mostly cooked (you can also do this on the grill for better flavor). Once you're finished this part, put them on a baking sheet with tin foil.
Stuff the caps with your tomato/onion/garlic mixture. Add your bacon bits, then top it off with a liberal amount of shredded mozzarella cheese and bread crumbs.
Melt 1-2 tbsp of butter down in your pan, then drizzle it over the breadcrumb top of your mushrooms.
Throw in the oven for about 7-10 minutes until your cheese melts.
Turn your oven to broil (550 degrees) and keep a close eye on your mushrooms - take them out once the tops begin to brown. BEWARE - they will burn quickly!
Take them out, sprinkle with parsley, and you're done!

Items not dumpstered or donated: Bacon, garlic, rosemary (from garden), sage (from garden), thyme (from garden), parsley (from garden), mozzarella, butter, olive oil, soy sauce, balsamic vinegar, pepper & salt

July 5, 2011

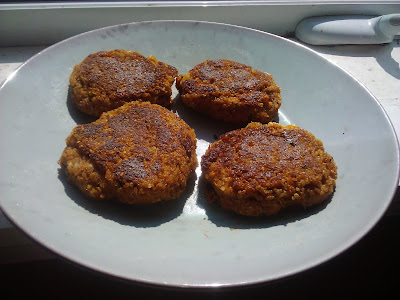
Vegan Quinoa Hippie Burgers

It's not really a secret that I'm a little bit of a hippie dirtbag deep down inside. I was vegetarian for 8 years, 2 of which I was vegan for. Although I now eat meat again, I still have a soft spot for the old classics of my vegan days.

Enter the vegan burger.

There's a lot of different ways to make vegan burgers. Most of the time, changing up the base ingredient is what makes each one special - people use things with lots of protein like black beans, lentils, pinto beans, kidney beans, or quinoa (a grain that is a perfect protein). I like using quinoa the most, since I'll make up a batch as a side dish for dinner and then have leftovers that I want to transform into something else...

VEGAN QUINOA HIPPIE BURGERS

Ingredients:
- 2.5 cups cooked quinoa (I cooked mine with freshly chopped rosemary to give it a little extra flavor)
- 1 cup roasted red pepper hummus (you can also substitute cooked chickpeas and a little water, or any other flavor of hummus, but it's not as tasty) (p.s. EXTRA BONUS PROTEIN!)
- 2 tbsp tomato paste
- 2-3 tbsp soy sauce
- 2-3 tbsp flax seed meal (harder to dumpster, but I lucked out with a 3 lb. bag one time, so I'm set for life)
- 2 cloves garlic
- Crap-ton of fresh basil (to taste)
- 1 tbsp fresh thyme
- 1 tbsp lemon juice (this brightens up the flavors of the spices and hummus)
- 1 tsp ground cumin
- 1 tsp paprika
- 2 tbsp olive oil
- 4-5 tbsp wheat flour

Mix everything up in a bowl. Taste it to see if the spices balance in the way you'd like.
Make into big meaty patties.
At this stage, you can freeze the patties for use later by sticking wax paper between them and putting them in an air-tight container - they'll last up to about 3 months.
Fry on high heat in the olive oil so they don't fall apart and get super-crispy (the crispy texture is crucial or else the hummus can make the texture a little weird and the patties will fall apart).
Serve!

Wasn't that easy?

I'm was a total ex-vegan and put goat cheese and spring greens on mine, but you can add anything from avocado to homemade scented aolis (again, bad vegan) to tomatoes. I don't have any bread in my house either right now, so you'll have to use your imagination as to how these would look freaking amazing with burger fixin's on a bun (although, if you're gluten-free, never mind).


These are really great (and easy) to make for BBQs when you have friends who don't eat meat. I can tell you that being on the receiving end of a BBQ that has no substantial food options for you is a bummer ("What?! Just corn on the cob and fruit salad again? Awesome!").

A lot of folks assume that being vegan is really tough, but as long as you have an arsenal of high-protein, nutritionally balanced food, it's actually pretty doable and delicious.

Items not donated or dumpstered: Quinoa (from the Beet Food Co-op), garlic, rosemary (from garden), thyme (from garden), basil (from garden), cumin, paprika, salt & pepper