Showing posts with label dessert. Show all posts

November 15, 2012

Apricot Compote


APRICOT COMPOTE

Delicious by itself, drizzled on some pork or chicken, or as an accompaniment to vanilla ice cream.

Ingredients:
- 10 apricots, halved and pitted
- Zest from 1 medium lemon
- Slightly less zest from 1 orange
- 3/4-1 cup white sugar
- 6 cups of water
- A few drops of vanilla extract

Stir together the apricots, zest, sugar, water, and vanilla extract in a saucepan until the sugar has dissolved. Bring to a boil, reduce heat to low, and simmer gently until the apricots are soft and the compote has thickened, 40 to 50 minutes. If it's getting too thick, you may need to add a little extra water for it to reduce more. Taste before removing from heat.

Makes a few cups.

Ingredients not dumpstered or donated: Vanilla extract

March 21, 2012

Vegan Banana Coconut Milk "Ice Cream"


My friend Gerry served this at a dinner party. I was so jealous I didn't get any (it went fast) that I decided to try my hand at making a batch of my own! This is a great way to use up bananas that went straight into the freezer when you dumpstered them. Also, it's a healthy dessert since there's no added sugar and potassium galore! Now that the weather is getting warmer, I don't feel quite so bad about posting an "ice cream" recipe...there's a few more sorbets coming up in the future too...

Ingredients:
- 6 bananas, pre-frozen
- 1 can coconut milk (I hardly ever dumpster this stuff, but I got a few dented cans/boxes recently, which got me really excited!)

Stick it all in a blender until it's smooth-ish (no more banana chunks). Stick it in a container. Stick it in the freezer in an air-tight container. THE END. Makes roughly 1 pint.

When I went through my pint, I would drizzle a little honey and made a blackberry reduction (literally just sticking blackberries on the stove and cooking off the liquid until it's a sauce. You can easily do this with pretty much any berry) to put on top of it with some mint since I was eating this stuff for a long time and wanted to spice it up, but it's really nice plain too, or with a little nutmeg.

A warning about not eating the "ice cream" right when you make it: this stuff hardens up like a rock in the freezer since there's no added sugar or liqueur (the stuff that makes sorbets easily scoop-able), so you'll probably want to leave it out to thaw at the beginning of dinner so it's scoop-able by the time dessert hits. I also had some luck with putting it in the microwave to thaw it out, but that method was less reliable.

Items not dumpstered or donated: ZERO!

June 30, 2011

BANANAS!

I have the good fortune of dumpstering bananas often, usually in large numbers. Even dumpstering 1/8th of the bananas in the dumpster will usually yield up to 10 bunches.

Bananas are great, because they're pretty easily frozen and keep for a long time, regardless of how ripe they were when you got them initially. You can use them for smoothies, vegan banana ice cream (just mash up with a little cinnamon, brown sugar, and nutmeg. Freeze it and you're set), or one of my personal favorites: banana bread.


Banana bread is great for a lot of reasons.

1) I'm poor. Gift-giving times like pot lucks, birthdays, or Christmas can be difficult on the rent money, so finding cheaper, home-made alternatives to give as gifts is awesome. If you make a seriously yummy loaf of banana bread and wrap it with a jar of Nutella (less than $3) to spread on top, you just made someone's tummy very happy.
2) As stated before: banana bread + Nutella. GREAT.
3) Banana bread can be used as breakfast food AND snack food AND dessert food. Look at that versatility!
4) Overripe or defrosted bananas are actually ideal for making banana bread, so it's a dumpster diver's dream!

I'm still experimenting with finding the best banana bread recipe, so I'd encourage you to find one online or through your family that seems to be popular or to your liking (vegan, gluten-free, low-fat, etc.) until my recipe is fine-tuned enough to post.

To prepare you, most (non-vegan) banana bread recipes call for:

Ingredients:

- 3-4 bananas
- Butter
- Sugar (brown or white)
- 1 Egg
- Vanilla
- Baking soda
- Pinch of salt
- Flour
- Chocolate chips (optional)
- 1 loaf pan (most grocery stores will sell recyclable/disposable loaf pans if you're giving the bread as a gift or taking it to a pot luck).

If you're defrosting the bananas - be forewarned - there's usually some liquid at the bottom of your container once they defrost. This is NORMAL. Just discard the liquid and add maybe 1 more banana than your recipe called for (like, if it says to use 3, go with 4).

Also, I usually freeze bananas with their skins on. This just means that you need to cut them off before you put them in a smoothie or make vegan ice cream.

Also, don't be afraid if your bananas have brown spots. This is also normal.

Items not dumpstered or donated: Butter, egg, vanilla, baking soda, salt, flour (from the sadly now-defunct Beet Food Co-op)

April 7, 2011

Less Lazy, More Yummy - Apple Danish

I know I recently made an apple post, but this recipe blows that one out of the water, and is much more versatile in its uses. The last recipe is for when you're lazy and it's late. This recipe is for when you are going to bitch-slap breakfast into next week.

I get apples a lot when I dumpster. Many grocery stores will throw out a whole bag of apples when only one is bruised, wasting up to 10 good apples. I say, why let one bad apple ruin the bunch? There's a lot of creative things you can do with them (apple chips, chutney, apple butter, juice, applesauce, adding cheese/peanut butter for a snack, etc - you'll definitely see more renditions of what to do with apples in the future).

Given all the apple options, making something sweet is kind of a cop-out, and generally unhealthy. Plus, apple desserts rely on using many of your pantry ingredients (which last almost forever) for comparatively few dumpstered ones (a bad ratio for the dumpster diver or penny saver).

Still, this shit's delicious. It's way better than any danish I've gotten at the store. You can eat it for breakfast on-the-go, a snack, or dessert for a large dinner party or pot luck (I'm saving mine for an upcoming road trip). This recipe makes a full 11" x 17" pan of danish, so it'll last you a long time, which is nice, considering it takes about an hour to make. Just pop it in the toaster oven to reheat.

APPLE DANISH

Ingredients:

Crust (you can buy pre-made pastry crust, too):
- 3 cups flour
- 1 tsp salt
- 1 cup shortening (I used vegetable shortening, but butter is fine too).
- 1/2 cup milk
- 1 egg yolk, beaten (If you don't know how to separate eggs, let an adorable French man in this video teach you how) - make sure to keep the egg white for later.

Filling:
- Around 6 cups thinly sliced, peeled, & cored granny smith apples (I think I used 6 granny smiths and 1.5 gala apples).
- 1/2 cup sugar
- 2 tbsp flour
- 1 tsp cinnamon
- Sprinkle of nutmeg
- 1/4 cup butter
- 1 egg white, beaten

Glaze (Optional):
- 1.5 cups powdered sugar
- 1/8 tsp salt
- 1-2 tsp vanilla (put in one, then if it tastes too sugary, add another splash)
- 3 tbsp milk

For Crust:
Mix flour, salt, cut in shortening (I used a pastry cutter, but a whisk or fork will work fine).
Combine milk and egg yolk and add to flour mixture.
Roll out half the mixture on an 11 x 17 inch pan (Now, I don't have a rolling pin, but this doesn't stop me from being a pastry mama - you can use anything round to roll out your crust - I used a to-go coffee mug. In the past I've used wine or beer bottles too).

For Filling:
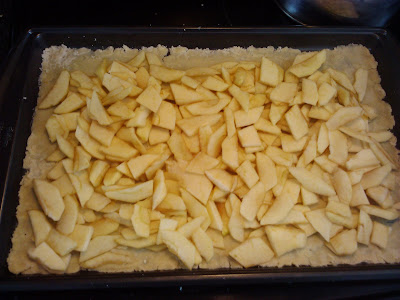
Arrange apples evenly in the crust, like this:
Combine sugar, flour, cinnamon, and nutmeg, then sprinkle over the apples.
Dot evenly with butter.

Roll out remaining pastry and place it over the cinnamon mixture. A cool, easy way to do this is to roll out the crust on saran wrap (which is the same width as your pan anyway), then just flip the whole thing over on top of your pastry and lift up the saran wrap.

Next, brush pastry with egg white - be careful not to let it pool up anywhere or else you'll get a cooked egg part, which tastes really funky and looks ugly.

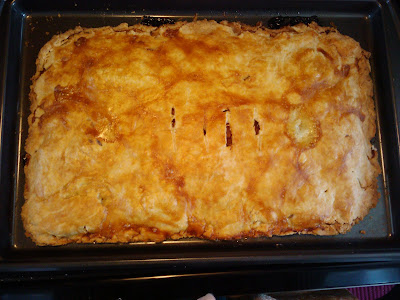
Bake at 375 degrees for 45 minutes.

For (Optional) Glaze:
Mix the powdered sugar, salt, vanilla and milk together.
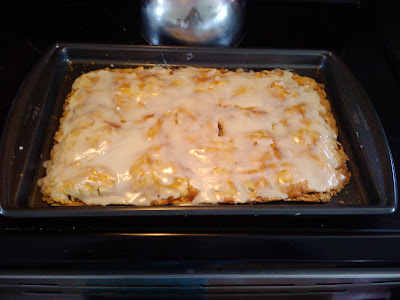
Spread on warm Apple Danish.

So, here it is without glaze:
And with:
Garnish with fresh or cooked apple if you're feeling feisty and want to show off:
IF YOU GLAZE THIS, KEEP IT REFRIGERATED SO IT LASTS.

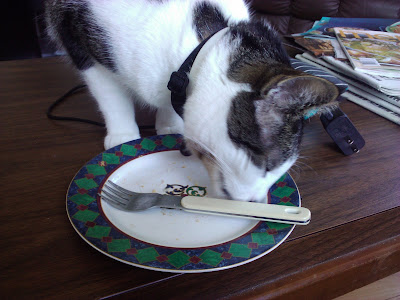
p.s. I know this is so wrong, but my cat liked it too:
Items not dumpstered or donated (A LOT. Darn.): Flour, salt, shortening, sugar, powdered sugar, milk, butter, cinnamon, nutmeg, egg, salt, vanilla

March 14, 2011

A Midnight Snack

Sometimes, right before bed, I'll get insane cravings for sweets. Murderous cravings. Nothing can stand in my way.

It must be something about the witching hour, because I usually don't even LIKE sweets all that much (I'm more of the "let's have some fruit and cheese for dessert" kind of gal). Still, when the cravings hit me, they hit hard.

This is a sweet, mildly healthy snack I made on a cold winter's night that gave me just enough sugar to go comatose and sleep for 8 hours (and it used up some apples that were on the verge of going bad)!

GOOEY HOT CINNAMON APPLES


Ingredients:

- 3 small "kid" apples (pretty much any kind of apple other than red delicious should work)
- 1/3 cup brown sugar
- 1 tsp nutmeg
- 1 tsp cinnamon
- 2 tbsp butter

Melt butter in the bottom of a pan.
Add sugar & spices, blending thoroughly.
Throw in quartered apples.
Keep heat on medium-low until apples are soft and your mixture is gooey, stirring occasionally.

FUN FACT: This is basically the beginning step to every apple pastry filling recipe.

OTHER FUN FACT: I begin volunteering at a local food bank starting TOMORROW. Look for a report soon.

Items not dumpstered or donated: Butter, sugar, spices