Showing posts with label basil. Show all posts

May 29, 2012

Thai Mushroom Ginger Coconut Curry


I first ate this dish when I was living in Prague.  My Danish friend and schoolmate Nicolai had me over for dinner, and was trying to explain to me how to make the dish since I thought it was so delicious.  Unfortunately, he didn't know the words for some of the mushroom types, but I eventually deciphered his recipe, which is actually quite simple once you know what mushrooms you're looking for.

Very rarely will you dumpster ALL the mushrooms that are in this soup, so don't feel horrible if you're missing some.  I just lucked out and happened to dumpster most of the ingredients prior to making it.

Ingredients:
- 1/2 pkg white mushrooms
- 1 pkg shitake mushrooms
- 1/2 pkg baby bella mushrooms
- 1 pkg oyster mushrooms
- 1 yellow onion
- As much ginger as your puny mouth can handle
- 1-3 cloves garlic (you can do more if you want)
- A handful of 3-minute noodles (rice noodles or ramen are ideal, but I've used spaghetti and it's worked out fine - spaghetti is pictured above since I was saving my rice noodles for a batch of pho)
- 1 can sweetened coconut milk (If it's unsweetened, just add a teaspoon or two of sugar) (coconut milk is a rare but exciting dumpster find in my experience)
- Water
- Salt & pepper to taste
- Fresh basil
- Fresh cilantro (optional)
- Green or red curry paste (optional)

Cut up the ginger into very small chunks (but don't grate it or mince it).  Throw pieces into about 2-3 cups of boiling water for 15 minutes (you don't want it all to evaporate, though or else you'll lose the gingery flavor the water takes on).
ADD SALT.  This step is important.  If you don't, your mushrooms and pasta won't be as flavorful.
Add your onion, garlic, and mushrooms to the water and let it reduce a little bit - until there's about 1 cup left.
Next, add coconut milk and bring to a low simmer again.  If you're using real noodles vs. quickly cooking ones, you'll need to bring the liquid to a bit more of a boil.
Add your noodles.  If you're using real noodles, cook until the noodles are tender.  Otherwise, just drop your ramen or rice noodles in for about a minute, then take it off the heat.
Add to taste - go overboard on the basil and add maybe just a teaspoon of green curry for the best results.

Ingredients not dumpstered or donated: Ginger, salt & pepper

May 22, 2012

Zucchini Noodles


My favorite vegan/raw food restaurant does a mean zucchini noodle dish that I'm super into.  So, when I dumpstered 5 zucchini and didn't feel like making zucchini bread or ratatouille, I decided to try making zucchini noodles for the first time instead.

<u>Ingredients:</u>
- 4 zucchini
- flavorful sauce of some sort (I used my pesto cream sauce recipe, but substituted peanuts and a little sesame oil in my pesto instead of cashews, since that's what I had)

Zucchini noodles are painfully easy to make.  There are cool contraptions you can buy to make it look more like pasta, but you basically just need a vegetable peeler and some time to accomplish a more fettuccine-type noodle.  You peel the skin off, then just keep peeling around the whole zucchini longways until you get to the seeds at the core.  At that point, you can cut the core up for a salad, stir fry, or ratatouille so you're using the vegetable in more ways than one!

Once you've made the zucchini noodles according to the directions above, you can make up some kind of sauce (I made a pesto cream sauce to keep it in the raw food category.  If you're vegan, you could just do pesto plus a tomato or something).  It's a pretty flavorful dish.

One thing to mention, though - the zucchini noodles lose their moisture if you salt them and leave them in the fridge over time, so try to eat them all up after one or two meals or they can get kind of gross...

Items not dumpstered or donated: cream, sesame oil, garlic

November 3, 2011

Vegan Red Pepper & Tomato Soup

It snowed. At the end of October. Unfortunately, I was out in it more than I had wanted to be all day (if you know me you know that cold weather is not my cup of tea). So, when I got home after a full day of work I needed something to warm me up - badly.

I ended up starting a cooking session that lasted a few hours (my housemates were at a Halloween party, so I had the quiet, peaceful house to myself). I ended up using almost all the food that was about to go bad in my fridge, prolonging the life of it a little longer.

To warm up, I decided to make a soup I'd never tried before from scratch, using as many ingredients as I could from my fridge. I had a lot of tomatoes, so I decided to go with tomato soup. It turned out I had a red pepper too, so I threw that in there as well.

Soup in general is an awesome dumpster chef's tool because you can freeze most soup for a few weeks up to a few months (depending on if it has dairy, what's in it, etc). This makes it pretty easy to polish off the rest of the dumpstered food in your fridge before it spoils. Plus, reheating your frozen soup in the microwave takes no time at all on days where you just want to eat without any prep work because you're freaking hungry.

RED PEPPER & TOMATO SOUP

Ingredients:

- 1 large tomato
- 3 small roma tomatoes
- 1 medium red pepper
- 2 long stalks celery
- 1/2 large red onion
- 2 tbsp olive oil
- 3/4 cup chicken or vegetable stock (bouillon is also fine to use if you don't have any previously frozen or bought stock)
- A large bunch of fresh basil
- 2-3 cloves of garlic
- 1 bay leaf
- Ground cumin (2 dashes), nutmeg (2 dashes), salt (a crap-ton), pepper (a smaller crap-ton), yellow curry powder (very small pinch), cayenne pepper (2-4 dashes), & cinnamon (very small pinch) to taste.

Makes about 2 dinner-sized servings.

Put olive oil in the bottom of a pan. Heat onions, celery, red peppers (you can roast your pepper ahead of time, which can give it extra flavor), tomatoes, and garlic at medium-high heat until they all soften up (you can leave it covered to keep some of the moisture in).
Add the bay leaf and a bit of salt.
Simmer for 20 minutes.
Add basil about 5 minutes before you take the pan off the heat.
Remove bay leaf (it will suck if you don't).

Put it all in a blender. Blend until smooth.
Put the mixture back into a pot and put it on medium-low heat.
Heat up chicken or vegetable stock (if you use vegetable stock, this recipe is vegan). Add it to your pot and thoroughly stir it in.
Add your spices to flavor the soup as you like. I like mine with a BIG punch of flavor (and the spiciness gives a little heat on those cold days), so I added a bunch (quantities delineated above). Garnish your soup with a little sprig of fresh basil and you're set! I also like to eat my soup with a piece of buttered toasty bread so I can dip it in the soup and savor it even longer.

Once everything's finished, it's time to curl up with the cat and savor the soup's warmth before I'm forced back out into the cold again.

Items not dumpstered or donated: Olive oil, garlic, basil (from garden), stock, all other spices, butter (on bread)

September 19, 2011

Eggplant Parmesan


This recipe was made for me on a first date in college. We helped make it together, assembly-line style, which was a cool, interactive way to get to know each other. The guy was a vegetarian and totally won me over (with the recipe). The eggplant was perfectly cooked - not mushy or gross at all like it can be if cooked poorly. Although things didn't work out romantically between the vegetarian and I, we're still buds and I still make his Eggplant Parmesan at least once a month. I have since dated many more culinary vegetarians.

Ingredients:
- 1 large eggplant (the vegetarian told me it's better if the eggplant is uniform in shape because then the medallions cook more evenly. I've experimented with lots of different sizes and it doesn't seem to make a difference to me as long as the slices are the same height).
- 1-2 eggs (depends on size of eggplant)
- Enough flour to cover a plate (about 1 cup, maybe a little more)
- Enough Italian bread crumbs to cover a plate (about 1 cup) - bonus points for homemade dumpster bread crumbs (recipe forthcoming)
- 3/4 jar of tomato sauce (extra bonus points if it's homemade and canned from dumpstered materials)
- 2 cups of shredded skim milk mozzarella cheese
- 1.5 cups of shredded Parmesan cheese
- 2 tbsp olive oil
- Basil, oregano, salt, & pepper to taste

It's easiest to think about this recipe in terms of chunks of actions, I think...so I'll put them down as such:

CHUNK ONE: PREP

Pour flour & breadcrumbs on two separate plates so they thinly cover the surface.
Take a baking sheet and cover with aluminum foil.
Beat your egg(s) in a bowl.
Slice eggplant into about 1/4-1/2" slices.
Preheat oven to 350 degrees.
Start heating olive oil in a large pan at medium/medium-high heat (but not so high a heat that the oil will burn).

CHUNK TWO: COVERING EGGPLANT WITH YUMMY STUFF/COOKING IN THE PAN

Press your eggplant slices in flour so there's a light dusting on each side.
Next, dip the eggplant medallions into your egg, followed by pressing them into the breadcrumbs so they're evenly covered on both sides.
Once a medallion is covered with all the ingredients, throw it in your olive oil. You want a nice golden brown crisp on each side, and ultimately want a fork to barely go through your eggplant if you stick it in near the edge. That's how you know it's ready for...

CHUNK 3: PUTTING THE EGGPLANT ON YOUR BAKING SHEET

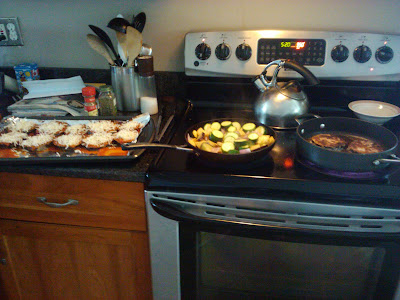
Hopefully you'll have started this next step as your eggplant medallions are cooking in the pan or else things will be really awkward (chunks 2 and 3 overlap if you're being efficient). In the picture below, you can see the eggplants cooking in the pan on the right and a few eggplant medallions ready on the baking sheet on the left, with my tomato sauce already prepped for my medallions to be placed on top of...in the middle is the beginning of my ratatouille - recipe forthcoming).


So, you take a teaspoon of sauce and put it on the baking sheet, using the bottom of the spoon to spread it around in a circle (about as large as your medallion).
Place a medallion on top.
Put another teaspoon of sauce on top of your medallion, along with any extra spices you want to add (I use a pinch of basil, oregano, sea salt, and black pepper).
Sprinkle mozzarella and Parmesan on top.

Repeat with all your medallions.

CHUNK 4: THE OVEN AND EATING

Stick that shit in the oven for about 10 minutes (as long as it takes for the cheese to melt and brown a little on the top).
Take it out and enjoy!

The magic of this dish is that the leftovers are just as amazing days later as when you first took the pan out of the oven. You can use a medallion on a burger bun for lunch at work (highly recommended), eat them as a savory late night snack cold, or you can just reheat them normally and eat some with a salad.

Items not dumpstered or donated: Flour (from the now-defunct Beet Food Co-Op), mozzarella, Parmesan, salt, pepper, egg, basil (from garden), oregano (from garden)

August 20, 2011

Pesto Grilled Cheese Flatbread

So, I know I've already given you my home made pesto recipe, but here's one more thing you can do with it - add it to sandwiches for a punch of flavor and wetness (you can also mix it with mayonnaise to make a pesto aioli for cold sandwiches like turkey or cucumber).

PESTO GRILLED CHEESE FLATBREAD


Ingredients:
- Home made or store bought pesto
- Bread (I used some old frozen naan I had dumpstered, but you can really use anything)
- Some kind of cheese (I used a mild white cheddar)
- Tomato, onion, whatever (optional)

I'm sure you all know how to make grilled cheese. If you don't, I'm sure the internet can teach you. Basically, just make a grilled or baked cheese sandwich with pesto, adding your favorite fixin's.

The pesto takes what would normally be kind of a boring lunch and adds more flavor and nutrients. Plus, you can really put anything on a grilled cheese - fresh tomatoes, prosciutto, onions, sprouts - you name it! You can get pretty creative and elevate your grilled cheese sandwiches without too much extra effort.

My pesto grilled cheese pictured here includes raw mild white cheddar, naan, red onions, and a little pepper to taste. I stuck everything in the toaster oven for about 5 minutes until the cheese was melted (not my usual m.o. for making grilled cheese, but it was faster than usual. Also, this method made the onions aromatic and a littttle soft, but they still retained their texture and crunch). I really liked the naan instead of thick bread, because it made the sandwich function like a flatbread, which is ALSO more exciting than a plain old grilled cheese lunch!

Unrelated: I just made some dank pesto cheesy sunnyside up eggs for breakfast this morning! Just one more use for pesto!

Ingredients not dumpstered or donated: pepper

August 10, 2011

Pizza


Pizza is one of the easiest dumpster food options EVER.

Why?

1. It's super-easy to dumpster or make pizza dough.
2. If I get a huge haul of tomatoes I'll make and can tomato sauce (which stays good for a long-ass time). Voila! Tomato sauce for your pizza whenever you want. (p.s. I'll put up my recipes for a few sauces I make soon). Tired of tomato sauce? Use homemade pesto instead!
3. Pizza toppings are endless. Types of cheese are endless. Therefore, whatever you get from the dumpster automatically becomes a pizza topping! One of my favorite dumpster pizza concoctions involved pork loin (still cold when we dumpstered it and used that night), 3 types of goat cheese, fresh basil, tomatoes, onions, baby portabella mushrooms, & dumpstered whole wheat dough. Not things I'd necessarily put together, but it tasted great! You can also get creative - why not have black beans, cilantro, and hot sauce on your pizza? Or Indian pizza made with dumpstered naan as the crust and curries or chutneys as the sauce? The pizza world is your oyster!
4. Pizza is really easy to make - put dough down, put olive oil/pesto/tomato sauce/whatever down on the pizza. Put toppings on the pizza. Bake at 425 in the oven until your pizza looks like pizza. Eat the pizza.

The pizza I made in the picture above was a little too packed with toppings (beware!), which made it kind of feel like a quiche, but otherwise it was yummy too. GO PIZZA!

Items not dumpstered or donated: Olive oil, oregano (from garden)

August 2, 2011

Cucumber Water

So, I first had this at a pretty bitchin' birthday pot luck recently. It was really nice, because I wasn't drinking, so a non-alcoholic option that wasn't just plain old water was an unexpected surprise! Lucky enough for me, I dumpstered a cucumber a few days later and was able to recreate it the way my friend Keith had made it.

(My cat, Iggy, even posed for the picture!)

CUCUMBER WATER

Ingredients:
- Cucumber
- Water
- Basil or Mint (optional)

Throw some thick slices of cucumber (and some basil or mint if you want) in some water. Let it steep for a few hours (or overnight) in the fridge. Serve it up!

You can re-use the cucumbers a few times, but each time the crisp cucumber flavor in the water becomes a bit weaker. The more you experiment, the more you can fine-tune your ratios and batches. I usually use a huge mason jar or pitcher so I have lots of cucumber water to drink over the course of a week!

p.s. you can also do this same exact thing with pineapple. I wouldn't recommend using defrosted pineapple from the freezer, though - it gives the water a weird freezer burn taste that is NOT tasty.

Items not dumpstered or donated: Basil (from garden)

February 20, 2011

Spinach-Basil-Cashew Pesto

Homemade pesto is a great way to make almost-wilted, almost-sad spinach (or basil) much happier and live longer. It's the route to take when your spinach is starting to wilt and isn't that appetizing in a salad anymore, but still usable for cooking. Pine nuts are traditional fare for pesto sauce, but I dumpster cashews more often (and they still taste great). You can also add parmesan cheese for protein.

SPINACH-BASIL-CASHEW PESTO
(vegan or vegetarian, depending on parmesan usage)

Ingredients:
- 1 bunch or bag of spinach
- 3 tbsp fresh garlic
- 1/3 cup fresh lemon juice
- 1 cup raw, whole cashews
- 1/4-1/2 cup nutritional yeast (optional)
- 3 tbsp olive oil
- 1 bunch basil
- Salt & pepper to taste
- Parmesan cheese (optional)

Using a food processor, finely chop cashews & olive oil.
Add garlic and process again.
Add spinach, basil, & lemon juice (and nutritional yeast and parmesan cheese verrryyy slowly).
Add salt & pepper to taste.
Chill and serve.
In a tupperware, this pesto will last at least a month (without parmesan), oftentimes more.

So, what can you use pesto for?

Pesto tastes great with chicken, salmon, shrimp, tomatoes (bruschetta!), grilled cheese, eggs, and pasta. It's also great to use as a twist on pizza sauce.

Here's how I used my batch of pesto:

CHIK PATTY & PASTA WITH PESTO PARMESEAN CREAM SAUCE
(absolutely not vegan, but very much vegetarian)

Ingredients:
- 1 chik patty (highly recommended)/chicken breast/light protein thing meat whatever
- 2-3 cups pesto
- 1-2 cups grated Parmesan cheese (if it's not in the pesto already)
- 1-2 cups heavy whipping cream
- A butt-ton of nutmeg
- Salt & pepper to taste
- 1 sprig fresh basil
- A few cups of whatever pasta you have on hand (I used farfalle)

Throw your pesto in a pan at medium-low heat.
As the oil in the pesto starts to melt a bit, stir in cream slowly, mixing constantly with a wooden spoon.
Sprinkle in Parmesan, constantly stirring (this is important, or else burning is imminent).
Everything should start to melt together - don't let the sauce bubble much or the milk will scald.
Sprinkle in a liberal amount of nutmeg (super awesome tip: nutmeg makes all cream sauces taste better. The French know what's up).
Keep adding milk and cheese at medium heat until everything tastes balanced and yummy and the sauce reduces a bit (about 15-20 min).
(Adding the cream looks pretty. Who says food isn't aesthetic?)

Simultaneously cook up your pasta and chik patty/preferred protein.

Mix it all up, shred some fresh basil on top, and enjoy! This is a super-easy recipe that looks impressive.
A word of advice: Microwaving pesto is a bad idea. It separates the oil from everything else and makes your dish all oily and kinda gross. It still tastes good, but the texture is a little weird.

Items not dumpstered or donated: Olive oil, garlic, spices, basil (from window garden), nutritional yeast

February 15, 2011

SO MANY POTATOES AND ONIONS

It's really hard to turn down free stuff. We all know it. So, when a dumpster is full of potatoes and onions for the taking, I figured "why not just take most of them? I can get inventive."

1 month later, I still have a full bag of potatoes and at least 20 onions (the good news is that both of these ingredients don't spoil easily).

The lesson learned? When dumpstering, you need to exercise a lot of restraint. Free stuff is free stuff, but overestimating what you'll eat is unfair to other folks who dive your dumpster and ultimately makes you just as wasteful as the stores you're scavenging from.

That said, sometimes you end up with a surplus of a few things. For me, potatoes and onions are my most prevalent dumpster finds. Potatoes can get pretty BLAH after a while, so you have to find ways to spice them up.

In case you needed some inspiration, here's a long list of potato and onion-related dishes and two potato recipes:

- Smashed Potatos (best w/ red potatoes - boil, smash with fork. Stir in butter & salt). Stir in homemade pesto to spice it up.
- Mashed potatoes (best with Yukon Golds. Boil, blend with milk, butter, & salt)
- Roasted potatoes (best with red) Coat bottom of a tin-foil covered pan with olive oil. Cut up potatoes into 1-inch pieces, put in the pan & coat with oil. Cover in salt, pepper, fresh rosemary, and whole garlic cloves (or garlic powder). Bake in the oven at 375 degrees until the potatoes are soft on the inside and crispy on the outside.
- Potato Latkes - perfect combo with homemade applesauce (recipe forthcoming) & sour cream.
- Potato Chips
- Hash browns - diced or shredded (for variety)
- Making soups heartier
- Baked potatoes (w/ sour cream, bacon, chives)
- Potato salad
- Gnocci (seems hard to make but is actually pretty easy - it just takes a little time to get ratios right)
- French fries (you can make them in the oven - you don't need a deep frier)
- Potato skins
- Veggie kabobs

GRUYERE POTATOES

My dad travels a lot for his work. So, he's eaten at a LOT of restaurants. A long time ago, he got into the habit of carrying around a food journal whilst voyaging. If he likes what he eats at a restaurant, he asks for the recipe so he can make it again for himself.

When I went off to college, he started sending me one of these recipes with each letter.

So, this recipe is from somewhere in France and is uber-yummy.

Ingredients:
Potatoes (Yukon golds or equivalently large baking potatoes are best)
3-4 cloves of garlic
Butter (unsalted)
Salt, Pepper, & ground nutmeg
Gruyere Cheese (and any other cheese if you'd like)
1-1.5 cup Beef bouillon or stock (if you don't have it or are vegetarian, you can use water)

Get a pyrex baking dish (or equivalent). Peel enough potatoes to fill half the dish. Carefully slice the potatoes so that they're paper-thin.

Peel and cut your garlic cloves in half and rub the garlic all around the bottom and sides of the baking dish, then take a stick of unsalted butter and coat the bottom and sides of the dish.

Next, put a layer of potatoes, some salt & pepper, ground nutmeg, and pats of butter over all the potatoes, followed by a liberal portion of grated Gruyere cheese. Repeat the layering process until you're out of potatoes, making sure the cheese is the last thing you put in the dish.

Pour boiling beef bouillon over the mixture.

Put the dish in an oven at 400 degrees. The dish will be done when the cheese on top turns golden brown - but don't let the cheese burn. If the potatoes aren't fully cooked, turn the temperature down to 300 until they're soft.

POTATO & ONION SOUP

Ingredients:
4 slices of bacon, diced (optional)
3 onions, chopped
3 tbsp butter
1/2 leek, chopped
6(ish) potatoes, peeled (I used Yukon golds)
Garlic powder, salt, black pepper, & cayenne pepper to taste
Water (approx. 6 cups)
2.5 tbsp flour (or more to thicken)
1 sprig basil

Cook bacon until brownish in a large pot.
Add butter.
Throw in chopped onions & leeks on medium heat until they're soft.
Put in the garlic powder, salt, & pepper.
Add flour slowly, sprinkling in.
Add water slowly, continuing to stir. Bring to a high boil to thicken the soup a bit.
Once it cooks down, add the potatoes and let them soften. Smoosh them with a spoon or potato masher to unleash their starch. This will thicken the soup a little more. At this stage you can add a cup of red wine and/or a few cups of (soy) milk or cheese. Don't use vanilla soy milk, though. It will taste disgusting. You can also throw in some rice, quinoa, pasta, or kale to make it more hearty.
Add one chopped potato at the end while the soup is simmering to add some textural variety.

Makes 2-4 bowls.

Items not dumpstered or donated: Butter, spices, bacon, flour, basil (from my window garden), (soy) milk

February 10, 2011

Cranberry Mint Lemonade & Basil Lemonade

One night, I got a million lemons from a dumpster session:

And, as the saying goes, when life gives you lemons, make lemonade. I don't like regular lemonade a whole lot (in fact, I'm not even that big a fan of juice in general). However, adding herbal infusions or tea make it much yummier and more exciting.

I know it's the middle of winter, but this refreshing drink reminds me of summer (even though it's cold). It's a good use for lemons that are starting to get a bit of white mold on the rind. If they are soft on the inside, then don't use them. If there's green mold, also avoid using them. Lemons typically last over a month if left in the fridge due to their acidity, so don't let the white mold on the rind put you off. Also, lemons aren't great to compost (especially if you vermicompost because the worms don't like the acid), so really try to use them before they spoil.

CRANBERRY MINT LEMONADE

Ingredients:
2-3 cups cranberries
Juice from 14 small lemons (about 3 cups of juice) (see lemon's scale below)
1 orange, quartered
6 (or more) cups water
2 pinches salt
3/4 cup sugar (or less if you prefer more sour lemonade)
2 sprigs of fresh mint
1 lime to garnish (optional)

Juice 13 small lemons. The scale of the lemons I get most often is this:
Juicing lemons by hand is a LOT of work - it may take a few sessions over several days.

Next, put cranberries & orange slices in a pot with 3 cups of water at medium-high until the water boils and all the cranberries pop (about 10 min).

Strain mixture and return juice to pot - put aside the pulp to eat or use for a sauce (check out cranberry sauce recipes online - most first steps involve doing what you just did)!
Add 1/2 cup sugar. Boil for 2 min.
Add lemon juice and remainder of sugar & water.
Add 1 sprig of mint.
Move to a container and let cool. Leave the mint sprig in the mixture for a few days when storing the juice to release more mint flavor, then remove it.

Pour into glasses (Mason jars are my favorite) with crushed ice. Add a fresh sprig of mint and a slice of lemon or lime to garnish.

Also, a variant:

BASIL-INFUSED LEMONADE

Ingredients:
3 cups of fresh lemon juice
6 cups (or more) of water
3/4 cup sugar
6 sprigs basil

Mix lemon juice, water, and sugar. Add 5 sprigs of basil (including stems). Cool in the fridge for at least a day before removing and composting basil. Serve with 1 sprig of basil for garnish and crushed ice.

For a more intense version of these, try adding a light soda (like ginger ale or sprite) or alcohol (I imagine vodka would be best). I don't drink anymore, so try it out and let me know how it is!

Perfect for a summer garden party.

Makes about 1200 ml.

Items not dumpstered or donated: Mint & basil (from my window garden)

January 11, 2011

Herb + Mushroom Risotto

I dumpstered two crumpled (but unopened) boxes of Trader Joe's Mushroom & Herb Risotto around June last year and hadn't used them yet (because dry goods pretty much last forever). This isn't unusual in the dumpstering world; stores throw out food with "ugly" packaging all the time, even when the contents are still good.

Plus, I have a soft spot in my heart for rejects. This package looks like a kitten at the SPCA, begging to be given a home.

I followed the instructions on the box, using chicken stock to cook the risotto. If you use veggie stock or water, then the dish is vegetarian. I also added a previously dumpstered portabello mushroom (sauteed in olive oil) that was about to go bad and basil from my window garden.

It was super-yummy and fed me at work for a few days.


An advantage to dumpstering dry or frozen goods is that they require significantly less preparation time and have a long shelf life. So, when I only have 30 min. to cook before I need to run out the door, dry goods are a nice option.

Items not dumpstered or donated: Olive oil, chicken stock, basil (from garden)